
This article is taken from https://www.sqlshack.com/recover-lost-sa-password/
You configured a new SQL Server instance and lost or forgot the “sa” password
- All the users who are part of sysadmin server level role are removed accidentally
- All the users who are part of sysadmin server level role are disabled accidentally
- Lost sysadmin access to the SQL Server instance
Consider this scenario:
Initially, I was a member of the [BUILTIN\Administrators] group. To illustrate this scenario, I connected to SQL Server using Windows authentication and I deleted all the logins in the SQL Server instance. Please refer to the below image that shows all the logins that were deleted and the login “sa” is disabled.

I closed the connection and tried to connect the SQL Server instance using the same account which I used earlier. I am unable to log in as I deleted all the logins and the group [BUILTIN\Administrators] from which I gained access earlier. Please refer to the below image that shows login failure error.
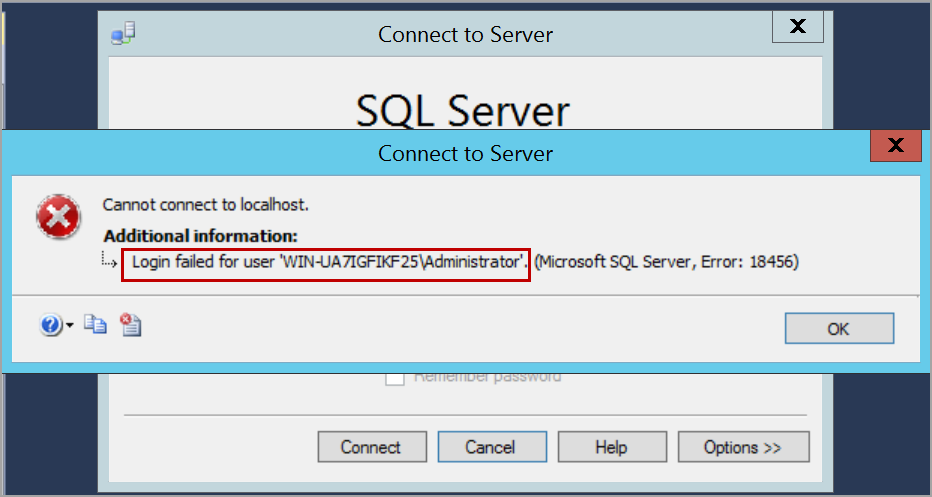
Now, I’ve lost access to the SQL Server instance. I do not have any login that can connect to the SQL Server instance. I do not know the “sa” login password or even if the “sa” login is disabled.
In this situation, to gain access to your databases, we can re-install the SQL Server instance and attach the databases. This process may take more time and effort.
To gain access to the SQL Server instance back or recover SA password, please follow the below steps.
Start SQL Server in single user mode
We need to start SQL Server in single user mode by adding the parameter -m or –f in the startup parameters. Open SQL Server configuration manager and select the service of SQL Server instance. Right-click and click on the Properties option.
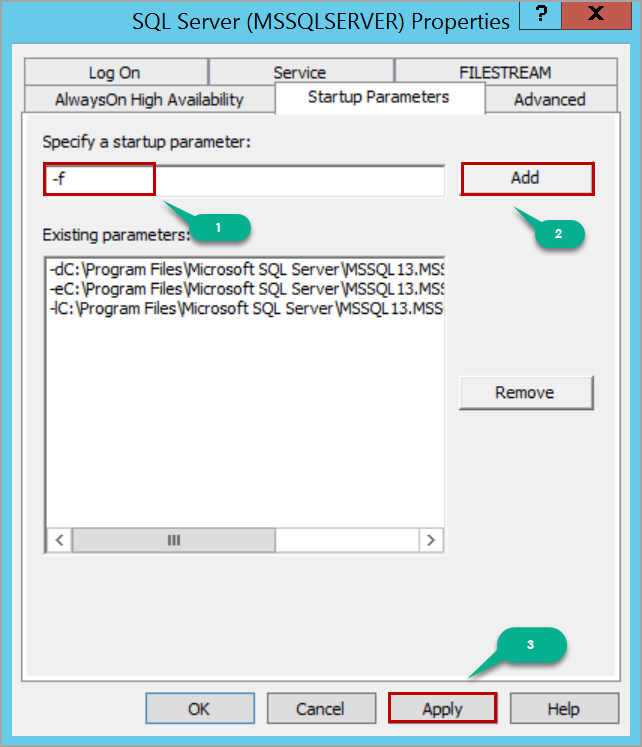
After adding the startup parameter, click on the Apply button and then the OK button in the warning message window.
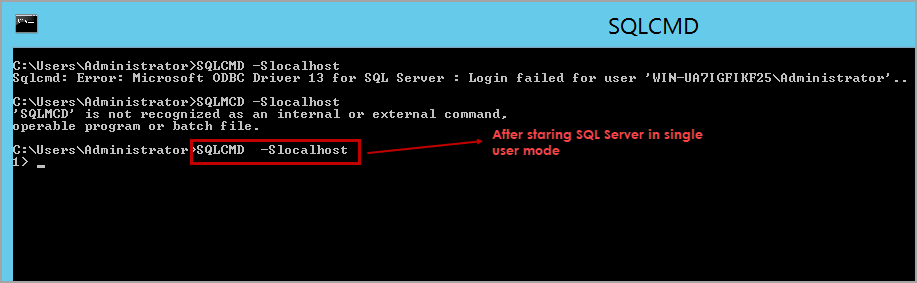
Restart the SQL Server service to start SQL Server in single user mode. When the SQL Server is started in single user mode, all the users who are a member of the host’s local administrator group can connect to SQL Server instance and they will gain the privileges of server level role sysadmin which helps us to recover SA password.
So, if you are a member of the local administrator group, you can connect to SQL Server instance using SQLCMD or SQL Server Management Studio. In this case, I am using SQLCMD.
Launch the Command Prompt and connect to SQL Server using SQLCMD. You would be able to successfully connect to the SQL Server instance.
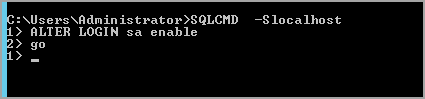
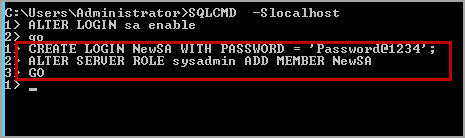
Now, if you know the password of “sa” login, just enable the “sa” login and start SQL Server in multi-user mode, connect to SQL Server instance using “sa” login and create whatever logins you need for your application to run.
Please refer to the below T-SQL script to enable “sa” login.
| ALTER LOGIN sa enableGO |
If you do not know the “sa” login password, create a SQL server login using the below T-SQL script.
| CREATE LOGIN NewSA WITH PASSWORD = ‘Password@1234’; |
Add the login NewSA to the server level role sysadmin. Please use the following T-SQL script to add the SQL Server login to the server level role sysadmin.
| ALTER SERVER ROLE sysadmin ADD MEMBER NewSA GO |
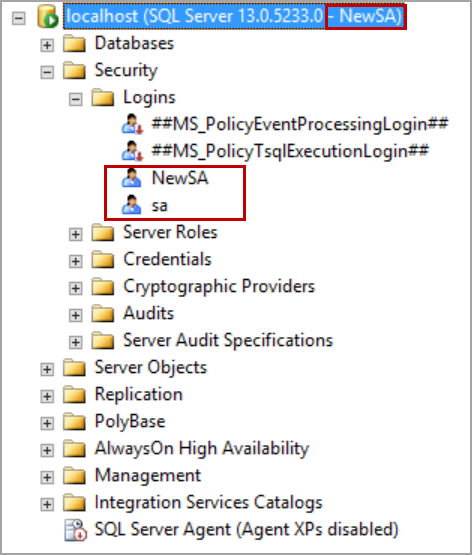
Remove the startup parameter -m or -f that is added and restart the SQL Server services. Now, SQL Server instance is started in the multi-user mode and has the login that you created above. Please refer to the below image that shows the connection is established using NewSA login which is created above.
In some cases, you may have not enabled mixed-mode authentication (i.e. SQL Server and Windows authentication mode). In this situation even though we create a SQL Server login, it does not allow us to log in to SQL Server and throws login failed error.
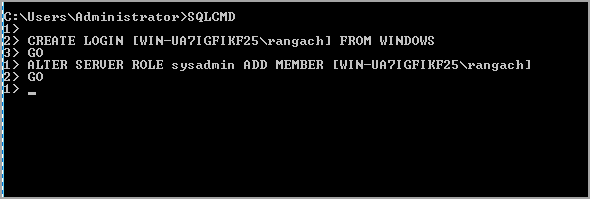
Create a login from Windows account. Execute the following T-SQL script to create a Windows authentication login in SQL Server.
| CREATE LOGIN [WIN-UA7IGFIKF25\rangach] FROM WINDOWSGO |
Execute the following T-SQL script to add Windows authentication login to server level role sysadmin:
| ALTER SERVER ROLE sysadmin ADD MEMBER [WIN-UA7IGFIKF25\rangach]GO |
Replace the computer name and the login name with yours.
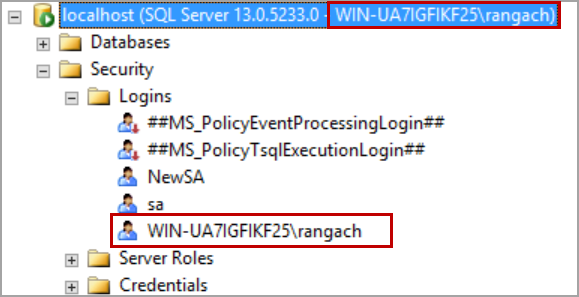
Remove the startup parameter and restart the SQL Server service. Log in to the computer with the same user as above.
Open SQL Server Management Studio and connect to the SQL Server instance using Windows authentication.
In case you want to create a login from Windows group, execute the following T-SQL script.
| CREATE LOGIN [BUILTIN\Administrators] FROM WINDOWS GO ALTER SERVER ROLE sysadmin ADD MEMBER [BUILTIN\Administrators] GO |
